
In this article, I will introduce you to how to use kubebuilder to easily create a Kubernetes operator.
After a quick introduction on kubebuilder, we will create step by step a k8s operator (using the example of the kube-image-keeper operator, an open-source tool for caching images within the Kubernetes cluster). Finally, we will discuss the benefits and limitations of kubebuilder.
What is Kubebuilder?
Kubebuilder, a framework for K8s operator creation
Kubebuilder is a framework designed to streamline the creation of Kubernetes operators. It empowers you to generate project boilerplate directly from your terminal including essential components such as Makefile, Dockerfile, and basic source files like main.go. Once the project is created, Kubebuilder also facilitates the generation of essential files for configuring Custom Resource Definitions (CRDs), controllers, and webhooks.
The controller-runtime and controller-tools libraries
Kubebuilder is based on the controller-runtime and controller-tools libraries. While it’s entirely feasible to develop an operator solely using these libraries without Kubebuilder, Kubebuilder simplifies the process by automatically generating necessary files and code, which would otherwise need to be manually created and written.
Kubebuilder, by example
Let’s look at a concrete example of using kubebuilder with the creation of the Kubernetes operator kube-image-keeper (kuik).
The Open Source kuik project
Kuik is an operator designed for in-cluster caching of container images in Kubernetes. It is very useful, for instance, when container image registries are temporarily unavailable or to prevent surpassing your registry pull quota (and incurring associated costs!).
Since kuik is open source, you have the opportunity to examine the entire architecture of a project generated with Kubebuilder by visiting the public GitHub repository of kuik.
Returning to the project architecture. In short, it consists of two controllers, a mutating webhook, and a CRD as shown in the diagram below:
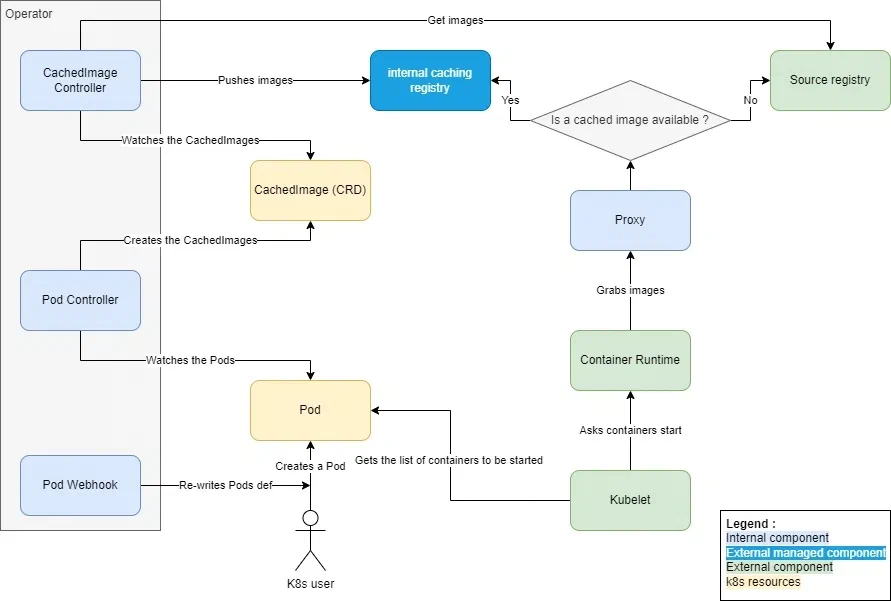
- First, the webhook rewrites the URLs of the Pod images, redirecting them to the cache registry.
- Then, the two controllers monitor both Pods and CachedImages: the first one creates CachedImages based on the images used by the Pods, while the second one caches the images requested through the CachedImages.
- When the kubelet asks the container runtime (e.g. containerd) to launch the containers, the runtime retrieves the images through the proxy because the images have been rewritten to point to it.
- Lastly, the proxy decides whether to forward the image pull request to either the cache registry or the original one, depending on whether the image has already been cached.
Create the base project with kubebuilder init
Now, everyone to your terminals! We will generate the basic scaffolding (or boilerplate) of our kubebuilder project. To do this, in an empty folder, execute the following command:
kubebuilder init \
    --domain kuik.enix.io \
    --repo github.com/enix/kube-image-keeper
The “domain” corresponds to the api group of the resources we will create, and the “repo” to the git repository where the project is located.
Kubebuilder creates several files and folders, including:
- config: a folder containing the project’s kustomize manifests.
- Dockerfile: a distroless Dockerfile.
- hack: a folder containing the boilerplate of the source files (useful for inserting a license at the top of each source file).
- main.go: a pre-filled main that allows you to immediately launch a functional “no-op” operator.
- Makefile: this makefile allows you to run the controller, run tests, or even generate the yaml manifests of the CRDs.
- PROJECT: a file that describes the kubebuilder project and its various components.
Generate controllers with kubebuilder create api
Now that the base project has been generated, we can start creating our controllers.
The CachedImages controller
We will start with CachedImageController, its role will be to watch the CachedImage, and cache the referenced images or delete them from the cache when a CachedImage is deleted:
kubebuilder create api \
    --kind CachedImage \
    --version v1alpha1 \
    --namespaced=false \
    --resource=true \
    --controller=true
The flags --resource and --controller allow you to ask kubebuilder to generate the CRD and the corresponding controller for the specified kind. Otherwise, the choice will be made interactively. The flag --namespaced=false indicates that we want the CachedImages to be non-namespaced.
The Pods Controller
To generate the basic structure of the controller responsible for watching Pods and creating CachedImages, we can use a similar command. However, we instruct Kubebuilder not to generate a Custom Resource Definition (CRD), as Pods are already native Kubernetes resources:
kubebuilder create api \
    --group core \
    --kind Pod \
    --version v1 \
    --resource=false \
    --controller=true
After running these two commands, we end up with several new files. Notably, in the controllers folder, we can find the two files cachedimage_controller.go and pod_controller.go, as well as suite_test.go containing what’s needed to quickly set up integration tests. The CachedImage type is defined in the api/v1alpha1/cachedimage_types.go file. We notice that the main.go file has been updated to launch our two new controllers. Finally, the PROJECT file now includes information about the resources and controllers set up.
For illustration, the pod_controller.go file looks like this:
package controllers

import (
	"context"

	corev1 "k8s.io/api/core/v1"
	"k8s.io/apimachinery/pkg/runtime"
	ctrl "sigs.k8s.io/controller-runtime"
	"sigs.k8s.io/controller-runtime/pkg/client"
	"sigs.k8s.io/controller-runtime/pkg/log"
)

// PodReconciler reconciles a Pod object
type PodReconciler struct {
	client.Client
	Scheme *runtime.Scheme
}

//+kubebuilder:rbac:groups=core,resources=pods,verbs=get;list;watch;create;update;patch;delete
//+kubebuilder:rbac:groups=core,resources=pods/status,verbs=get;update;patch
//+kubebuilder:rbac:groups=core,resources=pods/finalizers,verbs=update
func (r *PodReconciler) Reconcile(ctx context.Context, req ctrl.Request) (ctrl.Result, error) {
	_ = log.FromContext(ctx)

	// TODO(user): your logic here

	return ctrl.Result{}, nil
}

// SetupWithManager sets up the controller with the Manager.
func (r *PodReconciler) SetupWithManager(mgr ctrl.Manager) error {
	return ctrl.NewControllerManagedBy(mgr).
		For(&corev1.Pod{}).
		Complete(r)
}
The Reconcile function defines the reconciliation loop. This is where the controller’s logic is implemented.
Generate files related to a CRD
Once the controllers are implemented and the CachedImage type defined, we still need to generate the yaml manifest of our CRD to install it in our Kubernetes cluster.
Annotations
If you open cachedimage_types.go, you can see the definition of a CachedImage that will look something like this (the complete file is a bit longer, but this part is the most interesting for you):
type CachedImageSpec struct {
	Foo string `json:"foo,omitempty"`
}

//+kubebuilder:object:root=true
//+kubebuilder:subresource:status
//+kubebuilder:resource:scope=Cluster
type CachedImage struct {
	metav1.TypeMeta   `json:",inline"`
	metav1.ObjectMeta `json:"metadata,omitempty"`

	Spec   CachedImageSpec   `json:"spec,omitempty"`
	Status CachedImageStatus `json:"status,omitempty"`
}
In addition to the structures, we can see various annotations. These annotations describe how to generate the corresponding CRD. For example, +kubebuilder:resource:scope=Cluster indicates that CachedImages are not namespaced. Other annotations are available, for example, you can add columns to display during a kubectl get thanks to the annotation +kubebuilder:printcolumn:name="Foo",type="string",JSONPath=".spec.foo". In this specific case, we add the “Foo” column displaying the .spec.foo value of our CachedImages.
make generate and make manifest commands
To generate the files related to our CRD, we will use two commands.
The first, make generate, is automatically executed when calling the kubebuilder create api command and creates the api/v1alpha1/zz_generated.deepcopy.go file which implements certain essential functions of the operator, such as for instance the CachedImage.DeepCopy function.
The second command is the one we are most interested in: make manifests. This command generates the config/crd/bases/kuik.enix.io_cachedimages.yaml file containing the definition of the CRD that we can subsequently install in our Kubernetes cluster.
Generate a webhook with kubebuilder create webhook
We’ve created our two controllers and our CRD, all that’s left is to create our mutating webhook.
To do this, we normally use the kubebuilder create webhook command. However, we have a small problem: kubebuilder does not support webhook creation for “core types”, and the webhook we want to create is precisely intended for Pods. We therefore follow the instructions from the official kubebuilder documentation to create the boilerplate for this part ourselves using the controller-runtime library.
In case you want to create a webhook for your custom resource, it’s as simple as creating a controller:
kubebuilder create webhook \
    --kind CachedImage \
    --version v1alpha1 \
    --defaulting
You have the choice between the flags --conversion, --defaulting, and --programmatic-validation to create different types of webhooks. At least one of these 3 flags must be provided, corresponding to the following functionalities:
--conversion: Conversion webhook--defaulting: Admission webhook implementing the Defaulter interface--programmatic-validation: Admission webhook implementing the Validator interface
Run tests with make test
After configuring the various components of our controller, the next step is obviously to check that everything works correctly. To achieve this, we implement the neceassry tests, with the focus on integration tests in the suite_test.go file.
To execute the tests, we use the make test command which takes care of downloading the test dependencies and their execution. We can use the ENVTEST_K8S_VERSION environment variable to choose which version of the Kubernetes API to run the integration tests with, for example, ENVTEST_K8S_VERSION=1.25. However, be cautious, only a part of the control-plane will be launched, that is, the API server and etcd, but the various controllers other than those we created will not be executed. The behavior can therefore be slightly different from what is expected. You can find more details here in the documentation.
Running the operator locally
To simplify the development process, kubebuilder allows you to easily run your operator locally on your machine using the ‘make run’ command. It is obviously necessary to be connected to the Kubernetes cluster on which you intend to operate.
However, when your operator includes a webhook, some precautions are necessary. Tthe webhook requires a certificate for proper functioning (the one specified in the corresponding MutatingWebhookConfiguration) and requests made to the webhook must be sent outside the cluster. In this case, we will go through a URL rather than a Kubernetes service in the webhook configuration (MutatingWebhookConfiguration.webhooks.clientConfig). The documentation advises disabling webhooks by setting the ENABLE_WEBHOOKS=false environment variable before testing your code locally.
Kubebuilder: advantages and limitations
Now that we have seen the use of kubebuilder to create a Kubernetes operator, let’s look at its advantages and limitations:
Advantages of Kubebuilder
- Quick K8s operator development: Kubebuilder facilitates swift project initiation.
- Effortless creation and maintenance of CRDs: It simplifies the process of defining and updating Custom Resource Definitions.
- Built-in scaffolding for integration testing: Kubebuilder sets up a Kubernetes API and etcd (excluding control plane controllers) with the specified version. This is very handy for test matrices in GitHub.
- Simplicity compared to Operator SDK: Kubebuilder offers a more straightforward approach in comparison to Operator SDK, which itself is built on Kubebuilder.
Limitations of Kubebuilder
- Tedious and manual Kubebuilder updates: When upgrading to a newer version of Kubebuilder (and consequently updating the generated code to benefit from improvements), there are no explicit instructions for modifying previously generated files. Simply updating kubebuilder is insufficient, as the existing files remain unchanged in their original state. To incorporate enhancements from a new Kubebuilder version, the simplest approach is to regenerate the project in a new directory and then manually apply the scaffolding changes to the original project. This task can be tedious. Although a solution design has been proposed to facilitate this task, it has not been implemented at the time of writing this article.
- Native support for Kustomize but not Helm: Kubebuilder automatically generates Kustomize manifests without offering users the option to choose. If a user plans to deploy his applications using Helm, he must manually write the Helm manifests.
- Non-standard directory structure: the
controllerandapifolders should be in thepkgorinternalfolders. - Version dependency between Kubebuilder, Kubernetes, and Golang: it can be difficult to update one of these three elements without needing to update the others. For example, updating the golang version may require updating the Kubernetes version and dropping support for older versions. A specific version of kubebuilder is designed to work with a particular Kubernetes version, and so on.
- Use of dependabot (GitHub bot for automatic dependency updating): you may need to ask dependabot to ignore certain dependencies managed by kubebuilder, as updating them can lead to issues. As mentionned earlier, the versions of Kubebuilder, Kubernetes, and golang are closely linked and generally require coordinated updates.
- Binaries in the gitignore folder: the makefile installs binaries in a folder ignored by git. When updating the project, remember to delete these binaries so that kubebuilder can reinstall them. Forgetting this step can result in binaries having a version misalignment with Kubebuilder, potentially causing project malfunction.
- Scaffolding for core types: kubebuilder icannot generate scaffolding for Kubernetes core types such as Pods. This aspect requires manual configuration. In the example of the kube-image-keeper project, we used a mutating webhook on Pods. Kubebuilder was not able to generate the necessary files for this webhook, and we had to create them manually.
Our opinion on kubebuilder
Kubebuilder can significantly simplify the development of your Kubernetes operators. It seems particularly valuable when launching a new project. However, depending on the operator, it has limitations that complicate its usage and necessitate deviations from the tool’s initial operational and file organization. In such scenarios, you will need to carefully assess whether it’s worthwhile to continue using Kubebuilder or transition to manual operator updates.
Before we conclude, if you are a fan of Kubernetes, I invite you to read our article “Improving the availability and caching of container images thanks to kube-image-keeper”. It describes the features and benefits of kube-image-keeper, a tool we’ve open-sourced for the Kubernetes community’s benefit. All your feedback will be more than welcome!
Do not miss our latest DevOps and Cloud Native blogposts! Follow Enix on Linkedin!