
OVHcloud’s Managed Kubernetes Service (public cloud) addresses many of the challenges highlighted in this article. However, there are relevant cases for deploying Kubernetes on dedicated infrastructures (bare metal, VPC, private cloud).
In this article, we delve into this scenario, sharing our tips for deploying a Kubernetes cluster on OVHcloud dedicated infrastructure. We’ll set it up manually or using our automation tools.
When would this approach be useful? For example, when addressing these specific needs expressed by some of our shared clients:
- Reluctance to use shared infrastructures and deploy in the public cloud
- Having control over the control-plane (especially api-servers & underlying db etcd)
- Ability to use any bare metal servers, with or without GPU, as Kubernetes workers
- Ability to use VM workers from your own virtualization cluster (e.g., OVHcloud’s private-cloud VMWare offer or a ProxmoxVE cluster you’ve set up on bare-metal servers)
In such setups, we face two common challenges when deploying Kubernetes on-premise:
- How do I expose my services to the Internet?
- How do I store data for my stateful workloads (Kubernetes’
PersistentVolume)
Today, we’ll tackle these two challenges together!
Exposing Services to Internet : Load balancer & Ingress Controller
This section discusses how to make our services accessible over the Internet. The use of an ingress-controller with Kubernetes is quite straightforward. At Enix, we often use the Nginx ingress controller (from the Kubernetes project) because it’s widely adopted and offers most of the useful features.
However, a good ingress controller isn’t enough; it also needs to be exposed. On a managed Kubernetes cluster (whether at OVHcloud or elsewhere), you’ll have the possibility of using a LoadBalancer service. It automatically configures an external load balancer and assigns an ExternalIP to the Kubernetes service. However, in a self-managed setup, this feature isn’t available, requiring manual configuration.
When we are on our own infrastructure, we also deploy a pair (for redundancy) of HAProxy load balancers outside the Kubernetes cluster. These balancers announce the service IP to our routers via BGP. Unfortunately, it’s not possible to establish a direct BGP session with OVHcloud routers. We must find another solution.
One potential solution is to use VRRP. vRacks propagate layer2, and it’s possible to assign a public IP block to a vRack. The load balancers could then use the VRRP protocol to decide which one responds to the VIP at any given time. In theory, this would work, but I’m not a big fan of the technology and prefer an active/active setup.
Using OVHcloud Load Balancer Service
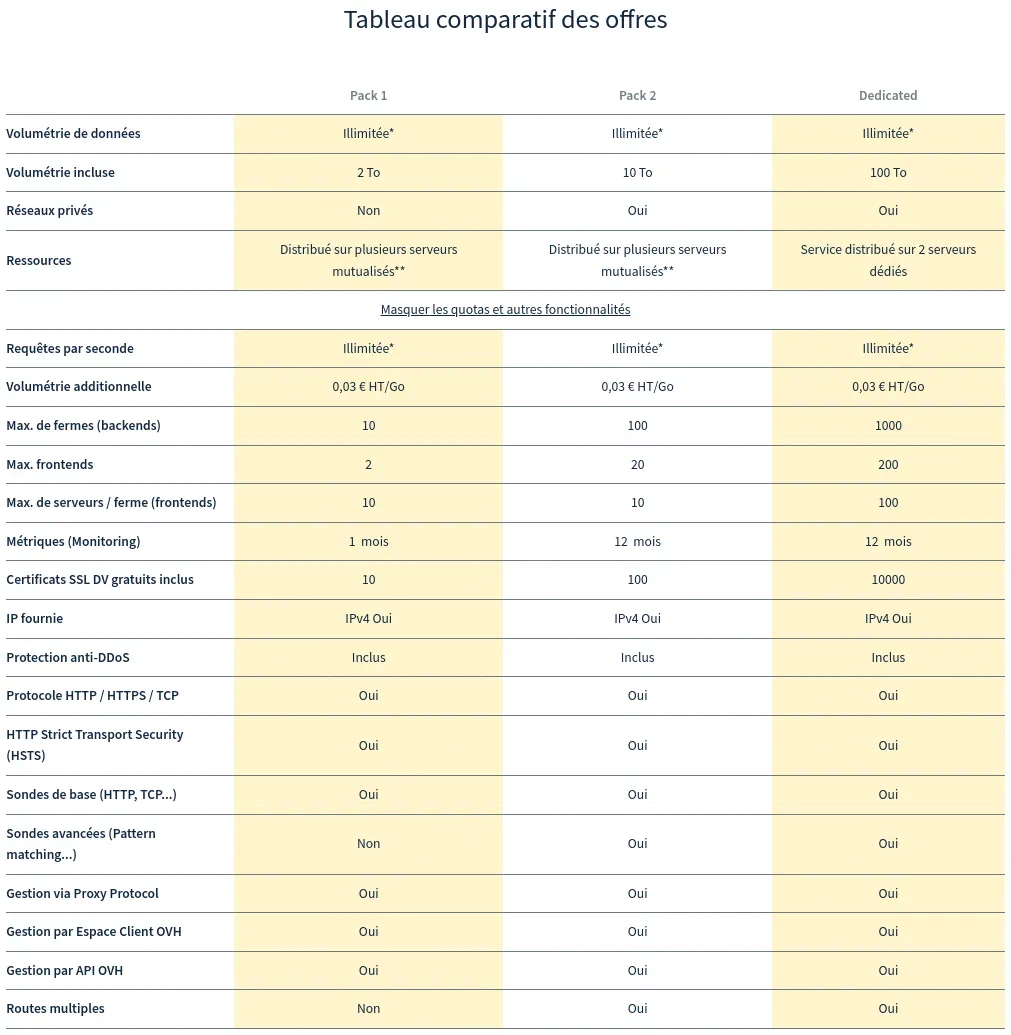
A solution we’ve validated involves OVHcloud’s load balancer service, which, in simple terms, is a farm of HAProxy load balancers deployed across multiple POPs (likely using the BGP protocol behind the scenes). You’ll need to consider using the “Pack 2” offer to attach your load balancer to a vRack.
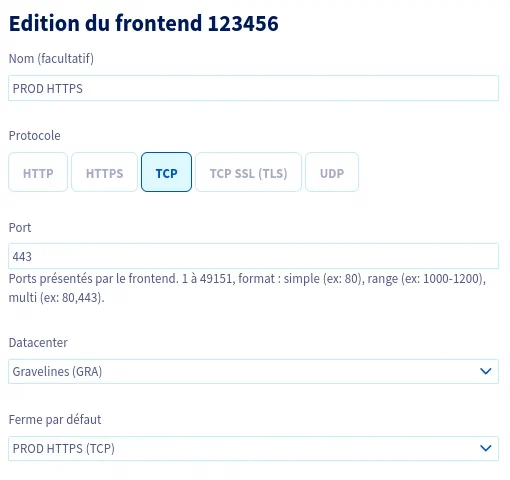
The frontend of the load balancer will be configured at level 4 to retain SSL termination on the Kubernetes cluster (and benefit from all the good things that cert-manager can offer).
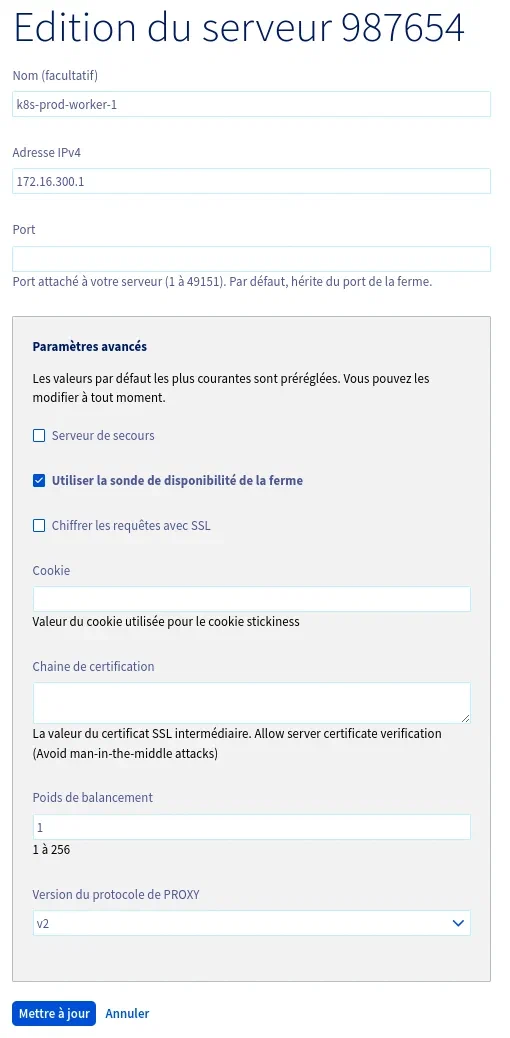
The proxy-protocol will be activated on each server within the farm to allow the retrieval of the client’s source IP address at the ingress controller level. Don’t forget to set up a probe on every server to ensure that malfunctioning nodes are removed from the cluster:
💡 It’s possible to share a single load balancer to expose the services of multiple Kubernetes clusters. In this case, you’ll need to assign an extra fail-over IP for each cluster on the load balancer, enabling the utilization of ports 443 and 80. You can then configure the frontend for each cluster by using the fail-over IP.
Ingress Controller Configuration
Regarding the ingress-controller, it’s configured as follows:
- Controller deployed as DaemonSet
- hostNetwork = true (for performance, so the nginx server listens directly on ports 80 and 443 without NAT or ipvs redirection)
- Proxy protocol enabled (to match the upstream load balancer configuration)
In practice, here’s what a snippet of values looks like when deploying the helm chart:
---
controller:
  kind: DaemonSet

  hostNetwork: true
  dnsPolicy: ClusterFirstWithHostNet

  config:
    use-proxy-protocol: "true"

  service:
    enabled: false
Storing Data for Stateful Worloads
Three Categories of Storage For Kubernetes
Based on requirements, we may implement three distinct storage types (or StorageClass) within our Kubernetes clusters:
“Node-local” storage, which typically relies on high-performance NVME SSDs (in terms of throughput and latency) to offer maximum performance for workloads requiring it. Since this storage is tied to a particular node, it introduces a maintenance complexity. Transferring workloads that depend on it to another node isn’t straightforward, especially during operations like kubectl drain <node>. We’ll use this type of storage for distributed tasks capable of autonomously replicating their data, like database replication — a fitting choice given that databases typically seek high-performance storage! For these needs, we use OpenEBS local provisioners (zfs or lvm) or the local-path-provisioner from Rancher.
“ReadWriteMany” storage is for specific stateful tasks that necessitate the sharing of a single PersistentVolume. For this, we use an NFS server coupled with the nfs-client-provisioner. Ideally, “modern” applications would bypass this constraint by using object storage to share data, but in practice, we still come across applications with this requirement. We use this storage mode for workloads that genuinely necessitate it, considering the operational intricacies of managing an NFS server and the challenges in ensuring its redundancy. It’s worth noting that OVHcloud provides an NFS-based NAS-HA service compatible with the nfs-client-provisioner, though we’ve yet to test it.
Lastly, there’s the “all-purpose” storage which is not tied to specific nodes, designed to ease maintenance and enhance availability. There’s a plethora of technical solutions available for this type of storage. Hyperconverged storage is an option, but its intricate nature, the novelty of related projects, and lackluster performance make us hesitant. On the other hand, at Enix, we’re used to managing Ceph clusters, a technology we’re familiar with. Setting up such a cluster at OVHcloud is possible, but not all our clients are ready to take the plunge: it requires a significant number of machines, and managing such a cluster can be costly.
Using OVHcloud’s Managed Ceph Storage
Fortunately, OVHcloud offers a managed Ceph storage service that can be used with Kubernetes. Let’s see how to set it up.
After ordering the “Cloud Disk Array” service, you’ll need to go to its management page and create a pool. We typically create 1 pool per Kubernetes cluster:

We’ll also need to create a user with full read/write access to the pool:

Lastly, don’t forget to add the public IP addresses of the Kubernetes nodes that will access the Ceph cluster via the “IP Access Control” page. Indeed, access to OVHcloud’s Ceph cluster can only be done exclusively through the public network and not via the vRack. Make sure to properly assess and size your public network interfaces when ordering servers. Also, consider this when configuring the network settings of the nodes.
💡 In our case, we virtualize the nodes with Proxmox VE hypervisors. To avoid routing all network traffic to the Ceph cluster through the platform’s firewall and to avoid allocating a public IP address to each K8s node, we configure each hypervisor to perform NAT on a dedicated bridge.
Our hypervisor’s network configuration might look like this:
auto vmbr1
iface vmbr1 inet static
    bridge-ports none
    bridge-stp off
    bridge-fd 0
    address 172.16.10.1/24
    post-up echo 1 > /proc/sys/net/ipv4/ip_forward
    post-up iptables -t nat -A POSTROUTING -s '172.16.10.0/24' -o bond1 -j MASQUERADE
    post-down iptables -t nat -D POSTROUTING -s '172.16.10.0/24' -o bond1 -j MASQUERADE
You’ll also need to add a route on each Kubernetes node to allow it to direct traffic to 10.0.0.0/8 (the nodes of OVHcloud’s Ceph cluster are addressed in different subnets of this network) to the hypervisor’s address in the bridge network:
ip route add 10.0.0.0/8 via 172.16.10.1
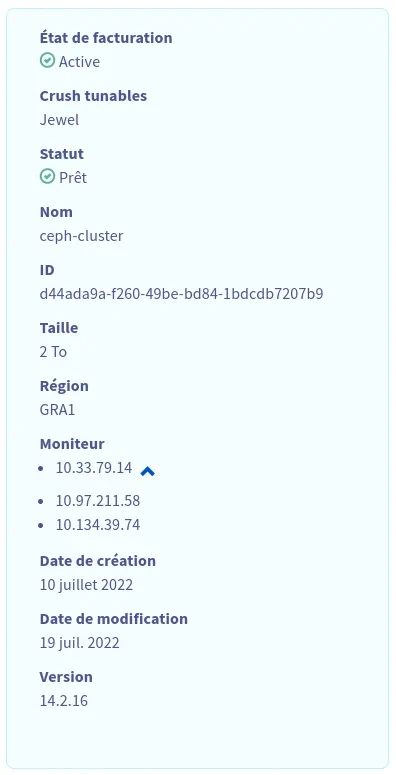
On the “Summary” page of the service, you’ll also need to retrieve the cluster ID and the list of monitor addresses:
Then, you just need to deploy the ceph-csi helm chart with the following commands:
helm repo add ceph-csi https://ceph.github.io/csi-charts
helm install --namespace "ceph-csi-rbd" --create-namespace "ceph-csi-rbd" ceph-csi/ceph-csi-rbd --values ceph-csi.yaml
Using the “ceph-csi.yaml” values file containing this information:
storageClass:
  pool: k8sprod
  create: true
  clusterID: d44ada9a-f260-49be-bd84-1bdcdb7207b9  # Cluster ID found on the "Summary" page
  annotations:
    storageclass.kubernetes.io/is-default-class: "true"
csiConfig:
  - clusterID: "d44ada9a-f260-49be-bd84-1bdcdb7207b9"  # Cluster ID found on the "Summary" page
    monitors:  # List of monitors found on the "Summary" page
      - 10.33.79.14:3300
      - 10.97.211.58:3300
      - 10.134.39.74:3300
Benefits of Self-Managed Kubernetes on OVHcloud
We’ve been running this type of deployment on OVHcloud in a production environment for more than 2 years in tandem with the public cloud managed Kubernetes service. With these two options, we can deploy and manage Kubernetes platforms on OVHcloud tailored to any client requirement.
The advantages of this self-managed K8s on dedicated infrastructure approach are:
- First and foremost, it grants us greater control over the cluster, its lifecycle, the selection of components, and the capability to “look under the hood” when we need to investigate an issue. In contrast, with managed K8s services from cloud providers, the control plane is hidden, potentially restricting specific configurations on the client platform). Moreover, there are clients who prefer not to deploy their platforms on a public cloud.
- Next, for clients with large infrastructures not requiring on-demand resource instantiation, a virtualized setup on OVHcloud’s robust physical machines can be more cost-effective, even when considering Enix’s management fees. The client also benefits from the expertise and proximity we’re accustomed to offering.
OVHCloud’s range of additional services (Loadbalancer, Cloud Disk Array…) allows us to tackle the challenges we typically face when rolling out this kind of self-managed Kubernetes setup: how to expose my services and how to store data for stateful workloads. We address this using standard solutions such as Ceph or HAProxy, with which we’re deeply familiar.
For those still hesitant to dive in or with custom needs concerning Kubernetes and Cloud Native: we’re here to help, so reach out to us! ;-)
Do not miss our latest DevOps and Cloud Native blogposts! Follow Enix on Linkedin!