
In our office, we have been using a rotating beacon to be notified whenever a new customer support ticket comes in, allowing a rapid response to our customers’s requests and sometimes urgent demands. We would now like to use an identical device for the notification of several types of monitoring alerts. Our original rotating beacon, of a pretty classical type, is made of an engine and a light bulb, both of which are controlled through a WiFi relay switch.
The aim of this project will be to design and to produce a RGB rotating beacon able to display several types of alerts through different movements of the light (rotating, blinking, etc…)
Designing a rotating bacon
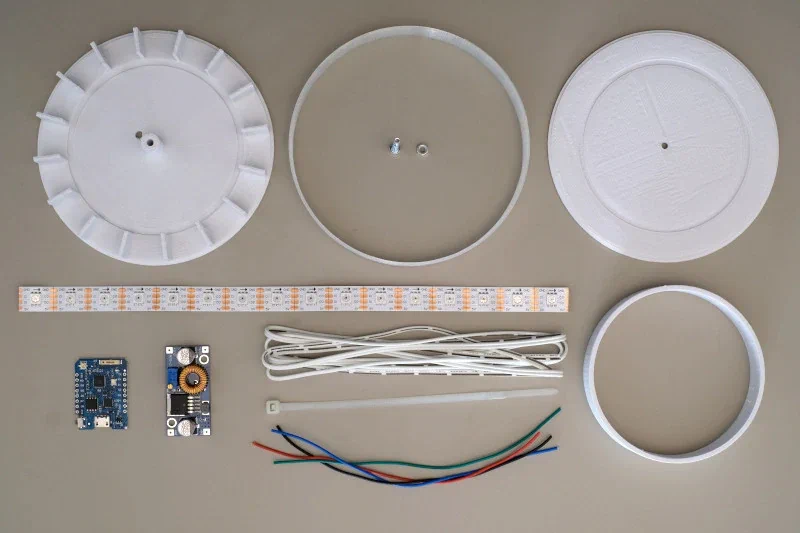
Our shopping list:
- RGB led strip : APA102 type, with 60 leds per meter
- Microcontroller ESP8266 « Wemos d1 mini » type
- 5v voltage regulator
- 3d printed box
To be more precise : the APA102 are adressable LEDs, so that the colour of each one of them can be individually monitored. In practice, 3 LEDs (red, green, blue) and one controller are set in a box fitted with an electric supply (+5v and ground wire), a data input and output « daisy chaining » the LEDs between them.

A controller is connected to one end of the strip, emitting a frame which successively supports the data for each color in each LED. When a LED receives a frame, it consumes the first data and then the rest is transmitted to the next LED.

To monitor the LED strip, we use a ESP8266 microcontroller. Well-known in the DIY world, such microcontrollers possess the advantage of encapsulating a WiFi interface, as well as benefitting from a very rich software ecosystem. For this particular project, we will use the MicroPython firmware, which allows Python scripts to be executed directly on the microcontroller.
And finally we will use a 5v (the LED voltage supply) switching regulator, allowing the rotating beacon to be provided with a different voltage.
Producing our 3d printed box
The box will be 3d printed in four parts:
- A base that will compartmentalize the beam from each led
- A spreader/diffuser printed in translucent plastic
- A cylindrical support upon which the led strip will be stuck, itself stuck upon the base
- A lid keeping it all shut

This box was designed with the help of Freecad, and its pattern can be downloaded here. Please note that the box can entirely be configured through this Config table:
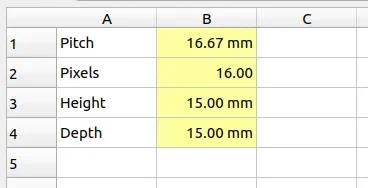
Pitchis the space between pixels, depending on the kind of strip you use (in my case, 60leds per meter, that is:1000/60 = 16.67 mm)Pixelsis the number of LEDs.Heightis the height of the beacon (from base to lid).Depthis the clearance space between the LEDS and the diffuser.- The diameter of the beacon is automatically calculated according to the pitch, number of pixels and clearance space.
Printing the 4 parts took around 5 hours on my Velleman K8400 printer for a 16 LED rotating beacon.
Cabling and final assembly
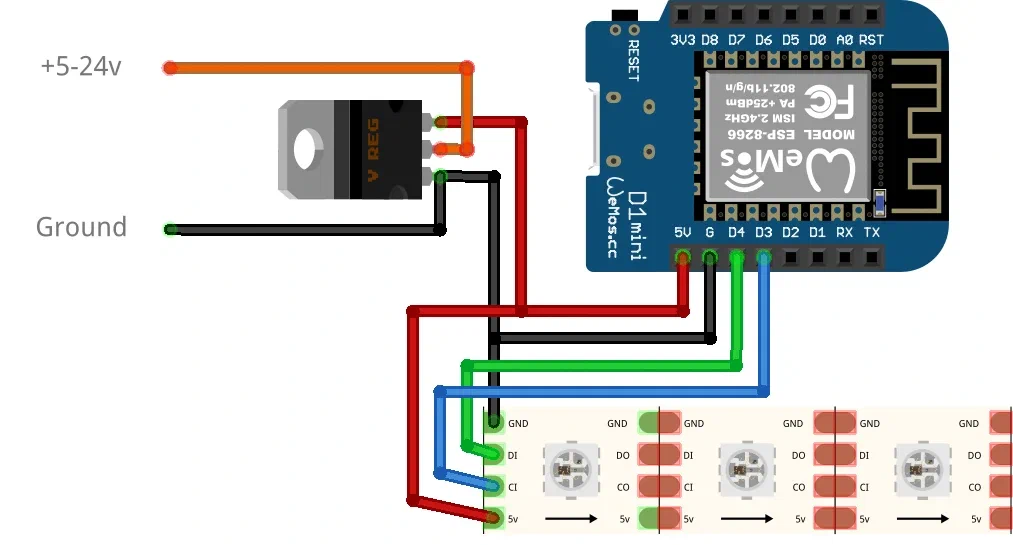
The cabling is rather simple. You connect the power supply (+24v max) to the voltage regulator input. Whereas the output should be connected to the LED strip power supply, as well as to the 5v power input of the D1 mini Wemos card (itself equipped with a 3.3 regulator since the ESP8266 requires this voltage to work).
The GPIO D3 and D4 output of the microcontroller are respectively connected to the clock and LED strip data signals.
Software part
The idea is to WiFi connect the rotating beacon to a MQTT broker. Often used in the IOT community, this particular type of broker allows the broadcasting of messages in Publish-subscribe mode. This way, the animations are encoded in the JSON format (see examples) and sent to the beacon along a specific MQTT channel.
In the standard version of the MicroPython firmware, you will find libraries enabling you either to connect to the MQTT broker, or to monitor/ drive (?) the APA102 LEDs. You can find our script on this github project.
To conclude
In order to trigger the different alerts, we now just have to connect our supervision to the MQTT broker. Here is the final result, displaying a wonderful animation designed by our intern Arthur Chaloin:
Do not miss our latest DevOps and Cloud Native blogposts! Follow Enix on Linkedin!