
We use OpenStack a lot at Enix, especially to automate the setup of Kubernetes clusters used during our training sessions. Whether through the Horizon web interface or via the CLI, the pleasure of deploying a bulk of Virtual Machines never dries up!
With a few years of using AWS behind me, switching to a private cloud was really easy. But in both cases, setting up and dismantling multiple virtual machines is still very time consuming. It is therefore on the good advice of Antoine and Romain that I tested Terraform; with the primary goal of automating deployment.
Whether you are a pro or a beginner of Infrastructure-as-code, I hope this article will give you a few tips. I faced many problems in this implementation, so I am sharing my feedback with you!
You will find in this article a lot of tips and tricks. I also will provide you with a complete and functional Terraform plan on github showing the feasibility of such implementation. Finally, don’t hesitate to ask me questions if you are interested in the subject!
Your mission, then, if you accept it: To deploy kubernetes 1.12 1.13 with an OpenStack integration, cloud-controller-manager off-tree as an option, relying on a kube-router network layer, via terraform as the only dependency on the workstation.

Why not use RKE or Kubespray to install Kubernetes?
Actually, we tend to use both of these two Kubernetes installers at our offices in Paris!
Rancher RKE
RKE is ultra fast to install a cluster, as much regarding configuration as for the actual installation actions. The Rancher team often comes up with real gems, so it’s no surprise.
Still, I’m a bit annoyed because until recently (before this pull request), it was mandatory to install a network add-on supported by RKE. And of course kube-router is not part of it !
It’s also a bit complicated in terms of maintenance:
- having a kubelet in a container managed by Docker, itself handled by the kubelet in question …
- with no other option but the
rketool when you want to modify the control plane configuration, or wasting your time manipulating RKE configurations
Kubespray
kubespray is the ultimate Swiss army knife for setting up a kubernetes cluster. Terraform is supported to provision nodes on your favorite cloud provider (public or private like OpenStack). There are so many features, it’s really impressive.
Yet again, I’m not entirely convinced. Taking such a long, long time, please help me!
- kubespray is largely based on ansible
- ansible is sequential
- there are many actions
- you can feel the dependence on other tools: frequent notes indicate that the latest version of ansible is problematic (seen on changelogs)
In addition to these small problems, you feel like facing a tentacular monster, configurable in the slightest detail but via several different files, so as Antoine would say: it’s thick. The heaviness of the project also poses a problem when it comes to supporting the latest versions of kubernetes, which can sometimes take a few weeks.
Kubeadm to the rescue
If there is one component representing the evolution of kubernetes, it’s kubeadm, meaning things are moving, and very fast. Initially, this article started on a 1.11 1.12 version. I now find myself presenting you a kubernetes installation in 1.13.
I use kubeadm’s module-based installation to phase the installation via the Terraform provisioners I’ll talk about below … and of course what did I see in the 1.13 changelog:
kubeadm has graduated kubeadm alpha phase commands to kubeadm init phase. This means that the phases of creating a control-plane node are now tightly integrated as part of the init command.
I’m told that the command lines have changed
This phasing by module allows me to generate the certificates linked to etcd without launching it via a static pod. I can deploy the etcd cluster outside the kubernetes cluster.
I also need the module phasing to install the kubernetes control plane on several nodes.
Please note that there is an experimental kubeadm join --experimental-control-plane function that allows you to add a control plane at the same time you deploy a new node. But I chose not to use this shortcut. The recent evolutions of kubeadm allow a kubernetes cluster installation without the help of any other tool.
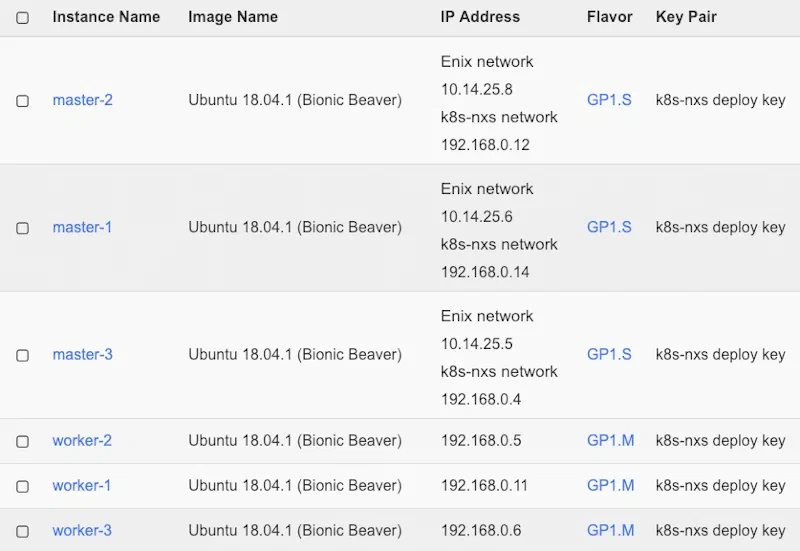
Step 1: Deploying the virtual machines on Openstack with Terraform
So, I want to deploy a Kubernetes cluster on OpenStack using Terraform. And we start with the virtual machines on Openstack.
If you often deploy whether a set of machines, or even a single one with a specific configuration on a cloud provider (public or private); the sometimes ergonomically limited web interfaces or the number of CLI commands will quickly tire you!
Cloud offers are much more complex than a box at Scaleway or OVH. I note three main reasons:
- You have to manage the structure of the network(s) (subnet, gateway, public ip)
- You have to manage the security (security groups)
- You have to manage the storage space of the machine
- … and many other value added services
This is true for public Cloud Providers: Google Cloud Platform, Amazon Web Services, Microsoft Azure, Alibaba Cloud, etc … as well as for private ones: OpenStack, Cloudstack, OpenNebula, …
One solution: Terraform
Terraform is an application written in go by Hashicorp that transforms Cloud Providers APIs into declarative language.
Actually, it rather goes the other way: from a plan file describing the desired system (my kubernetes cluster for instance), Terraform will connect to the (multiple) Cloud Provider(s) and set up everything. Rather than doing this stupidly, it will know via its tfstate file, if such and such an element is already in place and add, delete or modify only the necessary elements.
To fully understand this concept of declarative, I recommend that you watch Jerome talk about it in relation to kubernetes.
Many objects can be declared via Terraform: servers, networks, storage, security rules. These will be as many building blocks helping you build your IT cathedral.
Terraform will build a dependency graph for you between each object described in your plan. This will allow you to recover from an error when an action has gone wrong on an object, and it will also allow you to run everything in parallel. Compared to a sequential deployment script, this is a huge plus in my opinion.
The OpenStack integration with Terraform is done through a plugin automatically installed during a terraform init. I’d like to take this opportunity to mention that we (at Enix) have always had an excellent contact with Joe Topjian, one of the maintainers, a big thank you to him ! By the way, I’d like to mention that we also worked with Alibaba to solve some problems on their plugin. All this to say that the community around Terraform is reactive, so don’t miss it!
A large number of primitives exist for templating scripts or files. For example, you can inject the public IP address of the server that Terraform has just launched in order to configure a second server. You will also find a template_cloudinit_config object allowing you to work with the most complex cloud config. This is very useful for injecting elements specific to each node of the cluster, such as a variable of your Terraform plan, like the version of Docker to install.
Be careful when using cloud config : Terraform will launch the instance with its configuration, and the OpenStack API will reply done, but in reality, the machine has only just started running. So be aware that :
- scripts or package installations can end in failure
- downloads and installations performed by
cloud-initmay take a few minutes
OpenStack is not aware of this, and consequently neither is Terraform. This is the perfect opportunity to use a remote-exec provisioner that will connect via SSH and wait for the /var/lib/cloud/instance/boot-finished file to appear.
And this is where a desire to run scripts on the machines that have just been deployed usually quickly surges…
Step 2 : installing Kubernetes with Terraform
To perform tasks on freshly deployed virtual machines, Provisioners can help you. These are usually attributes of the server object that can also be attached to a null_resource dummy object. This particular object allows you to create additional steps in the dependency graph. By combining the two gives you a great flexibility to launch actions or scripts at a specific time.
To launch commands on a server, there are several options:
remote-execTerraform connects to and executes a program on the machinelocal-execlaunches a script locallyfileuploads a file on the machine
For purely educational purposes, I have used as few scripts as possible, favoring commands launched in remote-exec via the inline sub-option. When providing several commands (an array), it is a good idea to put set -e first because the default behavior does not check the return code of each command.
You will find in the repository all the actions performed with appropriate dependencies:
- setting up template-based configurations on the master nodes
- installing a load balancer internal to the cluster
- generating certificates on the first master node
- replicating certificates on the other master nodes
- generating and launching etcd certificates for each master node
- launching the control plane on each master node
- hot configuration of the cluster / configurating the cluster from scratch via the API (kubeadm init phase and specs customs)
- installing a kube-router as a DaemonSet
- and for each worker, a
kubeadm join
The files at your disposal are full of tricks that I invite you to discover. For example, the use of depends_on allows you to force the dependency in the Terraform graph, triggers ensure that you restart the actions linked to the object if ever a node must be added, …
There are no test conditions in a Terraform plan, so you won’t find any if or then or else. Yevgeniy Brikman suggests a solution based on the number of instances and the arithmetic available in Terraform plans. Problem solved!
In practice, I want the Master nodes of my kubernetes cluster to be reachable. And I have some secure Enix admin networks available. So I made my Terraform plan programmable so as to choose between a public or private (admin) IP.
When I use an admin network IP, the machine has two network interfaces. Beware of cloud-init which does not support a second interface in most recent Linux distributions. You need an ad-hoc configuration and a recent version >=18.3 of clout-init.
Step 3: Kubernetes cloud provider integration
Let’s go to the other side of the Force, kubernetes can be deployed on the Cloud Provider you use. Which actually will allow you
- to expose a service via a LoadBalancer type
- to have it managed by the Cloud Provider
- allowing your nodes without public IP to host services reachable on the Internet
- to request a PersistentVolume
- without worrying about the machinery behind (cinder, SAN, iscsi, …)
- to scale by adding nodes on the fly
- … in short, this is the option to put at the foot of your Christmas tree
This feature has been implemented for a long time by kubernetes, but things have changed a lot lately. Initially, a --cloud-provider=OpenStack flag was added to the kubelet on nodes and to the kube-controller-manager, but since 1.13 a new approach is in beta. I was following this closely but unfortunately I didn’t finish writing my article before it was done, holy crap!
In short, it has become too complicated for the kubernetes community to synchronize with all private and public cloud providers, and this, at each release. It was therefore decided to take out all the code related to Cloud providers and centralize it in a new component of the control plane: cloud-controller-manager.
In order not to create a rupture, kubernetes continues to publish the source code of this component in releases such as 1.13, and this is called in-tree.
But the new cloud providers (and soon the old ones) have no choice, they have to maintain themselves the code related to their APIs, in a repository external to the kubernetes project, this is what we call off-tree. For OpenStack you will find it here. So as you now understand, there are currently 3 ways to integrate a Cloud Provider with your kubernetes cluster
- kube-controller-manager, deprecated, it’s the easiest and it works
- in-tree cloud-controller-manager, limited to old cloud providers
- off-tree cloud-controller-manager, the perennial solution
Whether in-tree or off-tree, using cloud-controller-manager has a few implications: your Cloud Provider’s code is no longer in kubelet. So kubelet can’t detect the IP of its node by itself and therefore has to connect to cloud-controller-manager, which poses a problem for the TLS bootstrap of a kubeadm join. Your cloud-controller-manager must also be able to handle kubernetes objects (if RBAC speaks to you), such as nodes.
So in short, kubelets initialize with --cloud-provider=external and start with a node.cloud provider.kubernetes.io/uninitialized taint as long as they don’t get an IP.
When using two network cards per node (one for my admin network, remember?), cloud-controller-manager sees two IPs and gives kubelet the ~~last one, which corresponds to the admin network, but which is not good for me and the ~~ first one since 1.13.1 which is perfect.
A small anecdote to finish with,
- cloud-controller-manager runs in a pod;
- it is possible to run it in DaemonSet;
- kube-router must join the kubernetes API to know the IP of the node;
- cloud-controller-manager must recognize the node to assign it an IP;
- to create pods related to a DaemonSet, you need to get an IP from the network add-on;
- so you can feel the problem coming …
- and you can say goodbye to bootstraping it properly !
However, by launching clout-controller-manager as a static pod, things will go much better !
Step 4 : installing kube-router
Enix operates a significant number of network infrastructures for its customers. Our feedbacks push us to avoid, as much as possible, any encapsulation. Which is why we quickly fell in love with kube-router.
kube-router allows to avoid any encapsulation by announcing the subnets (the IPs) of the pods and services to the other nodes through BGP. The internal IPs of the cluster are thus directly accessible from any node thanks to the kernel routing tables. It can’t be simpler, nor more efficient, for it’s rock solid.
As soon as IPs from the kubernetes cluster pass on the network managed by OpenStack without encapsulation, you will face security problems. It is not normal to let packets from and to the CIDRs of the kubernetes cluster pass over the network interfaces. Therefore, you will need to instantiate the ports on each machine manually and add an allowed_address_pairs configuration to them as follows:
resource "openstack_networking_port_v2" "k8s_port" {
  count = "${var.nodes_count}"
  network_id = "${var.internal_network_id}"
  admin_state_up = "true"
  fixed_ip {
    subnet_id = "${var.internal_network_subnet_id}"
  }
  allowed_address_pairs {
    ip_address = "${var.k8s_pod_cidr}"
  }
  allowed_address_pairs {
    ip_address = "${var.k8s_service_cidr}"
  }
  security_group_ids = ["${var.security_group_id}"]
}
Note that the security_group is then no longer specified at the server level, but at the port level.
kube-router also implements network policies through IPtables. You may know that some of the recommended network add-ons for kubernetes do not support it, so this is good news. Finally, kube-router implements the equivalent of kube-proxy via ipvs, so you save a service to maintain in your cluster.
As far as installation is concerned, it is rather easy, since it is based on DaemonSet. Be careful though, yaml recipes are not always ultra clean. I had to add tolerations so that the DaemonSet starts on the initializing nodes.
A touch of security
I strongly advise against using the user_name and password variables of the OpenStack Provider which tend (in 100% of cases) to end up in your Terraform state … in clear.
It is extremely easy to obtain a token with a limited duration for the time of the installation.
openstack --os-auth-url=https://api.r1.nxs.enix.io/v3 --os-identity-api-version=3 --os-username=abuisine --os-user-domain-name=Default --os-project-name=enix/kubernetes token issue
You then just have to export the environment variable TF_VAR_openstack_token=<token> which will simply be interpreted by Terraform to avoid a systematic interactive input request.
It is also rather usual to give a public SSH key to Terraform so that it can be integrated via cloud-config/cloud-init in the authorized_keys of the instantiated virtual machines. But this is not enough when using remote-exec provisioners. It can be tempting to pass the private key as a plan parameter … this is also a very bad idea. Better use your ssh-agent so that nothing ends up in the Terraform state.
Finally, cloud-controller-manager for OpenStack uses a configuration file that only supports username and password fields. You’ll say to me “it’s ok, I understand, I don’t have to pass them as parameters of the Terraform plan”, yet it is not so simple …
One possible option is to use a password provider (such as Vault) to which you pass a token related to the installation. Valid for a short time, it will allow you to retrieve the OpenStack password from the host that needs it, without anything compromising being stored in the Terraform state.
A conclusion … among others
As you can see, this is only a demonstration, and probably unmaintainable as it is. However, it has allowed me to identify the main issues and to understand in detail certain aspects. In particular, one should remember,
- the graph dependency of the Terraform objects, which makes the tool fast,
- the simplicity of using OpenStack (as long as you are not the one administering the OpenStack control plane),
- and the evolution of installation concepts around kubernetes : if there were only one to be left, it would probably be kubeadm.
In the end, I’m pulling out my wildcard for everything about Persistent Volumes management via cloud-controller-manager. The Container Storage Interface 1.0 has just been released, so I’ll wait for it to settle a bit before talking about it.
That’s it, thank you all for the reading time and see you in 2019 for the rest!
Do not miss our latest DevOps and Cloud Native blogposts! Follow Enix on Linkedin!