
Since VMware was acquired by Broadcom, IT service departments have been facing significant price increases, prompting them to evolve their IT infrastructure (Information Systems and Business-specific IT platform) toward more sustainable solutions.
Among hypervisors, the open-source solution Proxmox VE has become one of the most popular alternatives to VMware. In response to its growing adoption, developers of virtualization-related software solutions are beginning to integrate Proxmox VE support into their offerings. This is notably the case with Veeam, a major player in backup solutions historically used with VMware. Proxmox VE has been supported since version 12.2 (August 2024) of its Veeam Data Platform.
We commend Veeam’s initiative to embrace open source, and we decided to test their solution on a Proxmox VE cluster. In this article, we share our experience with installation and usage, focusing on the most important backup and restore features.
Dependencies and Prerequisites for Using Veeam with Proxmox VE
Dependencies
Starting with version 12.2 of Veeam Data Platform, Proxmox VE support is natively integrated, requiring no additional plugins or options.
The dependencies for setting up Proxmox VE cluster backups with Veeam are similar to those for other virtualization solutions.
If you already have a functional Veeam deployment, your new Proxmox VE platform will seamlessly integrate into your existing infrastructure. If you wish to implement a new solution, we provide some details below, but you can also refer to the installation documentation already available for VMware.
Prerequisites
Proxmox VE documentation is not yet complete and does not include a chapter on prerequisites and physical architecture setup. At Enix, we implemented the following configuration for our tests:
- A VM on Proxmox (Proxmoxception 😀) with:
- 6 vCPUs in host mode to leverage the machine’s full performance (Xeon E5-2680 v4)
- 12 GB of RAM
- A 256GB SSD boot disk for the OS and Veeam cache
- Two 8TB 7200rpm SAS disks dedicated to the Veeam Backup Repository in Virtio-blk passthrough mode
- Windows Server 2022
- Veeam Backup and Replication version 12.2
Based on our tests, we consider this the minimum configuration required for a stable and performant Veeam backup platform. In real-world scenarios, this will depend on the amount of data you want to back up, the number of nodes, etc.
Additionally, if you have a centralized backup solution with multiple Veeam instances, you can set up Backup Proxies, independent Datastores, and other features offered by Veeam. The Proxmox VE plugin integrates seamlessly with these components.
Overall Architecture of the Veeam Data Platform for Proxmox VE
The official Veeam documentation for Proxmox VE clearly presents the architecture and interactions between components. For those who prefer a quick start, we have summarized the key points here.
The first thing to consider is the network architecture. We will focus on the simplest case (complex setups will require reading the documentation anyway 🙂), which is our test setup with a standalone Veeam backup server instance.
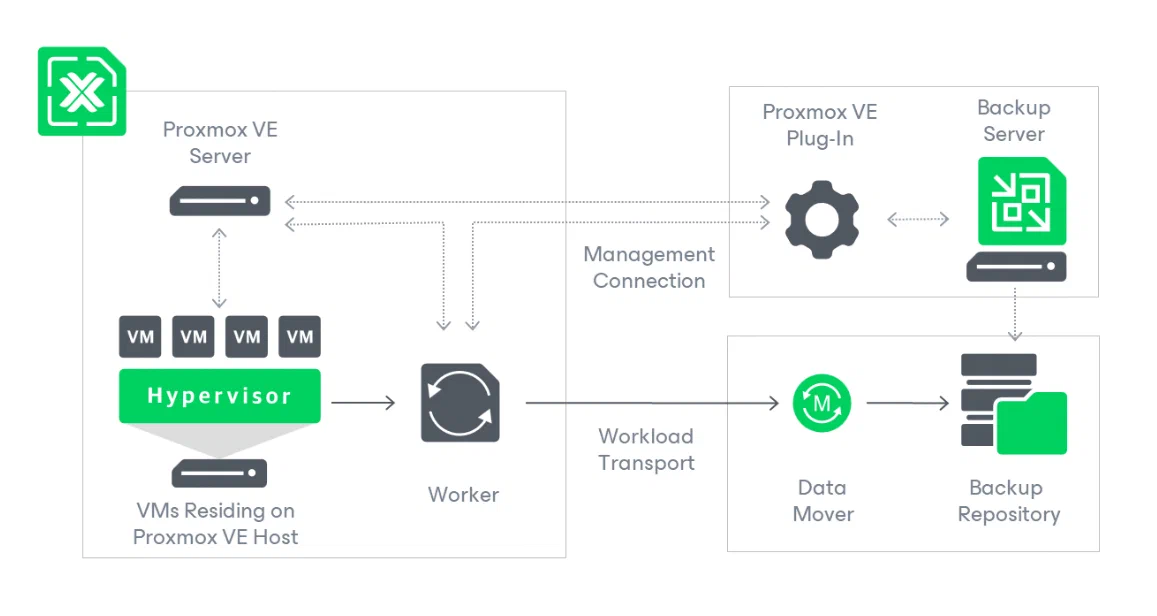
This diagram (excerpted from the documentation) provides a quick understanding of the overall system operation, which is quite standard for a backup solution:
- Using the Proxmox VE plugin, the backup server directly communicates with cluster nodes to gather resource information (VMs, disks, network) and potentially create VMs.
- Through the plugin, it synchronizes backup or restore tasks with a worker that handles the tasks, offloading backup workloads from the Veeam server and enabling the solution to scale automatically with connected platforms.
- The worker is central to the system, interacting with the Proxmox VE server to initiate backup tasks and access VM resources, sending this data to the Backup Repository via the Data Mover.
This is a solid conceptual diagram, but what exactly are these components, and how do they fit into our infrastructure? Starting with the simpler part: everything on the right side of the diagram is fully managed by Veeam. In our case, these components are installed on our Windows backup server.
But what about the mysterious worker? Who is it, and how is it deployed?
The Veeam worker is a VM running within the Proxmox VE cluster you want to back up. This elegant solution provides a fully customizable component controlled entirely by Veeam without requiring modifications to the Proxmox VE nodes’ OS installations.
In a traditional setup, external software would need to be deployed and maintained directly on the nodes’ OS. This can be complex in the long term, both for Veeam (to adapt to the rapid evolution of the Proxmox VE software base) and for users (to ensure the worker remains updated and compatible with the hypervisor version). Additionally, Proxmox users value the open-source model, and many may not appreciate having proprietary software installed on their OS base.
One important consideration: every VM requires dedicated resources on the hypervisor, unlike a software agent that runs on the OS. This must be factored in when sizing the resources for the backup solution.
Configuration of a Proxmox VE Cluster in Veeam Manager
To utilize the solution, the first step is to connect your Proxmox VE cluster to Veeam. While the documentation is comprehensive, we’ll highlight some key points that are not immediately obvious:
- Communication between Veeam and Proxmox VE relies on both API and SSH connections, requiring the use of a Proxmox realm @pam user with root privileges on the OS and Administrator rights in the Proxmox API. For our tests, we used root@pam, but in production systems, be cautious: since SSH keys are not supported, you’ll need to provide the manager with this user’s password, which it will store.
- If you have a Proxmox VE cluster instead of a standalone node (the most common scenario), you’ll need to add each node of the cluster individually to the Veeam Backup management interface. This isn’t a big issue for a 3-node cluster, but if you have 50 nodes that are frequently replaced, this should be considered.
- Each Proxmox VE node requires configured storage to host snapshots of the VMs being backed up, particularly if the storage on which they reside doesn’t support snapshots. For example, LVM in non-thin mode requires local storage that is sufficiently fast and sized to handle the load.
As noted earlier, the solution requires deploying a “worker” Veeam, which is a VM running within the Proxmox VE cluster. This worker acts as the interface between the Backup Server, the Backup Repository, and the Proxmox VE cluster itself.
When connecting a Proxmox VE node to the backup manager, you’ll automatically be prompted to add a worker to the node. If you miss this step and don’t deploy a worker at that point, you can do so via Backup Infrastructure -> Backup Proxies -> Add Proxmox VE Worker. A little tip: it took us a few minutes to locate this option in the interface 🙂
Worker VM Requirements
The following resources are needed to deploy the Worker VM for 4 simultaneous backups. The tool automatically adjusts the VM’s resources based on the number of jobs allowed:
- 6 CPUs
- 6 GB RAM
- 100 GB disk
The Veeam software stack is based on the Rocky Linux distribution, itself derived from Red Hat.
With this configuration, each worker can handle 4 simultaneous backup jobs. This is the default limit for both a worker on a PVE cluster and for a backup job. You can adjust this limit in the advanced configuration for both workers and jobs. However, it’s crucial to properly size the backup server and repository resources to manage the data flow effectively. These should be sized according to your cluster size, the number of VMs to be backed up, and the time window for backups.
Important Considerations and Limitations
To save you time, here’s a compilation of key information and potential issues you might encounter when configuring the worker:
- Open vSwitch is not supported for configuring the Worker VM’s network; only Simple bridge or the new SDN networks are available.
- If your network configuration requires VLAN tagging on the Worker VM’s network interface, you must configure this manually after the VM is created by Veeam, just as you would for any other VM in the cluster. Note that you should do this promptly during installation, or you may encounter errors indicating that the manager cannot communicate with the new worker.
- The storage you select for the VM’s installation must support snapshots, or the installation will fail.
Technical Process for Worker VM Creation by Veeam
For the curious, here’s a breakdown of how Veeam creates the Worker VM:
- Push of an ISO file
PveWorker_1.0.0.439.imgto the first storage that supports ISOs. Note: this may not be your preferred storage and is not configurable. - Creation of a VM using the ISO image and a 100 GB disk on the storage specified during configuration. CPU and RAM resources are allocated according to the number of backup threads set in advanced options.
- First boot of the VM, during which the base OS is installed from the ISO CD onto the VM’s disk, followed by a shutdown.
- Creation of a “Snapshot” of the VM before final configuration.
- Reboot of the VM with network configuration injected via cloud-init.
- Installation of OS updates and Veeam tools in the worker during this boot. This process is repeated on each worker VM reboot.
Ideally, you should configure a Veeam worker on every node of the Proxmox VE cluster so that backups are executed locally. Otherwise, Veeam will raise vague warnings about the backup being impossible in HotAdd mode and defaulting to “Network” mode. To understand the differences between backup modes (noting that Veeam’s most performant mode, “Direct Storage Access,” is not yet available for Proxmox VE), consult the documentation.
However, in our simplified architecture tests (which only use network connections and SSH redirections for traffic between the hypervisor and worker node), we observed no noticeable performance differences between the two modes, provided the network is adequately sized. This is merely an impression and not a formal measurement, so it’s still best to follow the recommendation.
Veeam Backup Process for Proxmox VE
Compliance and Backup Types
Veeam supports backing up all disks configured for a VM, regardless of the backend storage system used by Proxmox (NFS, iSCSI, LVM, ZFS, etc.). This is possible because the backup process hooks directly into the Linux <code>qemu</code> process running on the hypervisor.
The backend disk storage format is completely abstracted for the Veeam worker, enabling it to stream disk data during active use and perform reliable “snapshot” backups.
There are no feature differences in backups compared to other solutions, and it is possible to perform full backups and incremental backups.
Veeam’s Changed Block Tracking (CBT) feature, which avoids re-reading all VM disk data during backups, works with Proxmox VE through Qemu Dirty Bitmaps. This native solution requires no additional configuration.
Backup Configuration
To back up VMs, you need to create a backup job and configure retention periods, the backup repository, etc. This is standard and requires no special explanation.
However, understanding the VM selection process for a backup job is crucial. By default, you must add VMs from a cluster to the backup job individually, which is cumbersome. Alternatively, you can select all VMs in a cluster or all VMs on a hypervisor node, and add exclusion rules for specific VMs.
A missing feature is the inability to select VMs by Proxmox VE resource pool. In our use case, we prefer creating separate backup jobs for different platforms, organized into pools, to apply distinct backup settings (e.g., retention, recurrence). This is particularly necessary for multi-tenant clusters, where each client may have unique backup policies or repositories. With Veeam’s current integration, creating multiple backup jobs requires manually selecting VMs for each job and managing changes when adding or removing VMs.
Another limitation is managing the exclusion of specific VM disks from backups, which must be done manually in the backup job configuration. Unfortunately, Proxmox VE’s backup=0 disk configuration flags are not utilized by Veeam.
Quick Manual Backup
If, like me, you often need to create a quick backup of a VM before performing a particularly complex intervention on the infrastructure, a quick, instant backup is invaluable. Unfortunately, I find this process in Veeam far from optimal. It involves performing a VeeamZip backup, which is not only hard to locate in the interface but also time-consuming because it doesn’t leverage Veeam’s standard backup system.
The backup is not tied to a job, is stored differently in the backup repository, and doesn’t utilize the previous backup history. Instead, it generates a standalone backup capsule, which can be extremely slow for large VMs. Essentially, it’s like creating a ZIP file of the VM’s data, when all you might have wanted was a new “snapshot” for quick restoration in case of an issue.
Veeam Restore Process for Proxmox VE
The process of restoring a VM is straightforward and standard. Its operation on Proxmox VE is identical to that for other hypervisors supported by Veeam Data Platform.
When restoring a VM, two options are available:
“Restore to Original Location”: In this case, the VM with the same ID currently on the original Proxmox node is shut down, its data deleted, and it is recreated from the backup data. We do not recommend this method as it could result in worse outcomes if mistakes are made. This method overwrites the current data of your original VM, leaving no possibility to revert to the previous state.
“Restore to New Location, or with Different Settings”: This is the preferred choice. It allows you to restore the VM alongside the original, enabling you to test the backup and verify its contents before putting the machine back into production. However, you’ll need to manually stop the original machine to avoid network or resource conflicts. Note that, as with the Worker VM creation process, Veeam does not support VLAN tags for the network configuration of the restored VM. These must be added manually through the Proxmox UI to make the new VM functional.
Currently, Veeam’s “Instant Recovery” feature, which enables rapid VM startup without completing a full restoration, is not supported for Proxmox VE.
Lastly, a feature we haven’t tested yet but that could simplify migrations (and warrants another article) is restoring backups between different hypervisors, such as from an ESXi VM to a Proxmox VE VM.
Backup Integrity Features
Within Veeam’s SureBackup, the Backup Integrity features are well supported, just like on other hypervisors, including:
- Regular scans
- Backup signing
- Multiple copies to different sites
- Tape archiving
However, the Full Recoverability Testing feature, which involves creating a Virtual LAB, is not yet supported on a Proxmox VE cluster. You will need a VMware or Hyper-V instance to take advantage of this functionality.
Conclusions
A complete conclusion will follow shortly! We will publish a second article in the coming days detailing performance metrics and providing a long-term comparison between Veeam and Proxmox Backup Server, the latter developed by the same team behind Proxmox VE.
That said, if you’re already using the Veeam Data Platform for other virtualization solutions, you can confidently start using it for your new Proxmox VE virtualization platform.
While not all features available for other hypervisors are currently supported, Proxmox VE cluster backups with Veeam are reliable and production-ready, even for systems with critical data and complex architectures. You won’t need additional resources (aside from the required disk space 🙂), and there’s no additional licensing cost since Proxmox VE support is included by default in Veeam universal licenses (though you’ll need licenses for the nodes you add).
Do not miss our latest DevOps and Cloud Native blogposts! Follow Enix on Linkedin!