
Breathing new life into old tech: PXE for Talos, the Cloud Native way.
Simplify the installation of Talos OS for Kubernetes on bare metal servers with a containerized, GitOps-ready PXE server!
We recently helped a client migrate their Kubernetes clusters to Talos, an immutable OS purpose-built for Kubernetes (we particularly appreciate it for highly secure managed clusters, whether on-premises or in a private cloud).
With an infrastructure made up of around fifty large bare-metal servers, we faced a key challenge: how to efficiently install Talos OS on so many servers, both for the initial installation and for the frequent updates (which come with the immutable OS approach).
Historically, our client was using MaaS, but since it’s not compatible with Talos—and the client wasn’t particularly attached to it—we chose not to attempt a complex integration of the two tools and instead explored other options.
Using Omni, while an excellent choice, was ruled out due to its cost being too high for this project. The alternative of manually booting Talos .ISO images via the BMC also seemed far too time-consuming for so many machines.
➡️ So we opted for a more pragmatic approach: booting the Talos installer via PXE, with a touch of modern flavor. On the menu: a tasty mix of Docker and GitOps, with a pinch of older technologies like dnsmasq, iPXE, and TFTP.
Our goal: bootstrapping Talos with a PXE infrastructure, GitOps and Cloud Native style
Setting up a PXE infrastructure usually follows a classic pattern: configuring a server and installing the required services. Sure, we could have used a tool like Ansible to automate this deployment, but—little secret here—it’s not really my cup of tea.
So why not step off the beaten path? With Kubernetes, we especially value the ability to trigger a deployment with a simple commit. Containers have taught us to work with immutable, minimal, specialized, and versioned environments. Let’s apply these same principles to our PXE infrastructure, while keeping things pragmatic and elegant.
💡 All the examples from this post are available in this Git repository.
But wait, what is “PXE”?
In short, it’s a technology that lets you boot operating systems over the network. It relies on DHCP for automatic network configuration and on TFTP for transferring files.
Our goal is to boot the Talos installation image in order to bring nodes up in maintenance mode, ready to be joined to a Talos Kubernetes cluster.
To achieve this, we’ll use Dnsmasq, the Swiss Army knife of PXE infrastructures, which conveniently combines both a DHCP server and a TFTP server into a single service.
We’ll also leverage iPXE, an extended PXE boot firmware. Its HTTP(S) loading and scripting capabilities are particularly valuable. Instead of flashing this firmware directly onto network cards, we load it via the servers’ stock firmware, using a standard PXE boot process.
Our machine inventory
Let’s start by defining a format to describe the desired configuration for each machine. This needs to include:
- Hostname
- Network configuration
- The Talos installer version and associated schematicID
- Kernel arguments for Linux
- A unique identifier (in our case, the serial number)
To structure this information, we use a YAML file hierarchy organized like this:
nodes/
├── _defaults.yaml
├── k8s-dev
│   ├── node-01.yaml
│   ├── node-02.yaml
│   ├── node-03.yaml
│   ├── node-04.yaml
│   ├── node-05.yaml
│   ├── node-06.yaml
│   └── _defaults.yaml
└── k8s-prod
    ├── node-07.yaml
    ├── node-08.yaml
    ├── node-09.yaml
    ├── node-10.yaml
    ├── node-11.yaml
    ├── node-12.yaml
    └── _defaults.yaml
The depth of the hierarchy is arbitrary. In our example, we simply chose to group machines by cluster. Any YAML file whose name does not start with an “_” represents a machine.
The _defaults.yaml files are used to define default values for machines, with recursive evaluation of these values up the directory tree.
For example, with the following files:
nodes/_defaults.yaml :
schematicID: 376567988ad370138ad8b2698212367b8edcb69b5fd68c80be1f2ec7d603b4ba
talosVersion: v1.9.5
kernelArgs: talos.platform=metal console=tty0 init_on_alloc=1 slab_nomerge pti=on consoleblank=0 nvme_core.io_timeout=4294967295 printk.devkmsg=on ima_template=ima-ng ima_appraise=fix ima_hash=sha512
dns0: 1.1.1.1
dns1: 8.8.8.8
ntp: fr.pool.ntp.org
install: false
nodes/k8s-dev/_defaults.yaml :
netmask: 255.255.255.0
gateway: 192.168.100.1
vlan: 1234
interface: ens1
nodes/k8s-dev/node-01.yaml :
serial: ABCDEFGHIJ01
ip: 192.168.100.1
install: true
The effective values for node “node-01” will be the merge of all these files:
schematicID: 376567988ad370138ad8b2698212367b8edcb69b5fd68c80be1f2ec7d603b4ba
talosVersion: v1.9.5
kernelArgs: talos.platform=metal console=tty0 init_on_alloc=1 slab_nomerge pti=on consoleblank=0 nvme_core.io_timeout=4294967295 printk.devkmsg=on ima_template=ima-ng ima_appraise=fix ima_hash=sha512
dns0: 1.1.1.1
dns1: 8.8.8.8
ntp: fr.pool.ntp.org
netmask: 255.255.255.0
gateway: 192.168.100.1
vlan: 1234
interface: ens1
serial: ABCDEFGHIJ01
ip: 192.168.100.1
install: true
Generating the Dnsmasq and iPXE configuration
Now we need to transform these YAML files into Dnsmasq and iPXE configuration. For this kind of task, I like to use Gomplate. In a nutshell, this tool renders “Go” templates (similar to Helm) from a provided environment (environment variables or other datasources).
Its basic usage is straightforward, as shown in this example from the project’s documentation:
$ echo "Hello, {{ .Env.USER }}" | gomplate
Hello, hairyhenderson
Since Gomplate doesn’t natively support reading our YAML hierarchy, we wrote a small Python script to convert it into a “flattened” JSON structure that Gomplate can work with.
#!/usr/bin/env python

import argparse
import os
import pathlib
import json
import functools

import yaml


@functools.cache
def get_defaults(directory, root):
    """Compute the defaults from the provided directory and parents."""
    try:
        with open(directory.joinpath("_defaults.yaml")) as fyaml:
            yml_data = yaml.safe_load(fyaml)
    except OSError:
        yml_data = {}
    if directory != root:  # Stop recursion when reaching root directory
        return get_defaults(directory.parent, root) | yml_data
    else:
        return yml_data


def walk_files(root):
    for dirpath, dirnames, filenames in root.walk():
        for fn in filenames:
            if not fn.startswith("_"):
                yield dirpath.joinpath(fn)


def main(args):
    data = []
    for fullname in walk_files(args.directory):
        filename = (
            str(fullname.relative_to(args.directory).parent) + "/" + fullname.stem
        )
        if args.filter is not None and not filename.startswith(args.filter):
            continue
        with open(fullname) as fyaml:
            yml_data = yaml.safe_load(fyaml)
        yml_data = get_defaults(fullname.parent, args.directory) | yml_data
        yml_data["hostname"] = fullname.stem
        yml_data["filename"] = filename
        data.append(yml_data)

    print(json.dumps(data))


if __name__ == "__main__":
    parser = argparse.ArgumentParser()
    parser.add_argument("directory", type=pathlib.Path)
    parser.add_argument("-f", "--filter")
    args = parser.parse_args()
    main(args)
Here is the Dnsmasq template (dnsmasq.conf). Although it doesn’t contain templating instructions, we treat it as such for simplicity:
enable-tftp
tftp-root=/tftproot
tftp-single-port

dhcp-vendorclass=BIOS,PXEClient:Arch:00000
dhcp-vendorclass=UEFI,PXEClient:Arch:00007
dhcp-vendorclass=UEFI64,PXEClient:Arch:00009

dhcp-range=192.168.42.100,192.168.42.200,255.255.255.0,12h
dhcp-option=3,192.168.42.1
dhcp-option=option:dns-server,1.1.1.1,8.8.8.8

# 1st stage: pxe rom boot on ipxe
dhcp-boot=net:BIOS,ipxe.pxe,192.168.42.10,192.168.42.10
dhcp-boot=net:UEFI,ipxe.efi,192.168.42.10,192.168.42.10
dhcp-boot=net:UEFI64,ipxe.efi,192.168.42.10,192.168.42.10

# 2nd stage: ipxe load ipxe.conf script
dhcp-match=set:ipxe,175
dhcp-boot=tag:ipxe,ipxe.conf,192.168.42.10,192.168.42.10
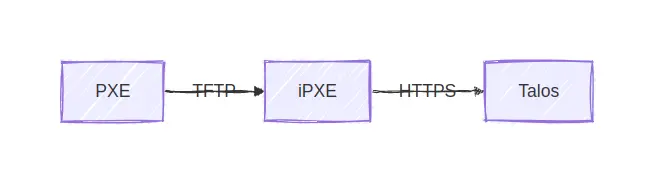
We should note a small peculiarity in how we use iPXE here: the DHCP server adapts its response depending on who’s asking (PXE firmware or iPXE), as illustrated in this diagram:

This two-step approach allows the PXE firmware to load iPXE, which in turn loads its machine-specific configuration script.
Here’s the iPXE script template defining per-machine configuration:
#!ipxe

dhcp

goto node_${serial}  || exit # or ${board-serial} depending on used hardware
# Default behavior (non install mode) is to exit iPXE script

{{ range (datasource "nodes" | jsonArray) }}
{{- if .install }}
# {{ .filename }}
:node_{{ .serial }}
{{- $ipArg := printf "ip=%s::%s:%s:%s:%s.%d::%s:%s:%s" .ip .gateway .netmask .hostname .interface .vlan .dns0 .dns1 .ntp }}
{{- $vlanArg := printf "vlan=%s.%d:%s" .interface .vlan .interface }}
{{- $kernelArgs := printf "%s %s %s" $ipArg $vlanArg .kernelArgs }}
imgfree
kernel https://pxe.factory.talos.dev/image/{{ .schematicID }}/{{ .talosVersion }}/kernel-amd64 {{ $kernelArgs }}
initrd https://pxe.factory.talos.dev/image/{{ .schematicID }}/{{ .talosVersion }}/initramfs-amd64.xz
boot
{{- end }}
{{ end }}
Some interesting details about this script: we use the goto instruction with a dynamic label based on a variable to jump to the configuration specific to the machine running the script.
In our example, we use the ${serial} variable, which corresponds to the chassis serial number of the machine.
A problem appeared during testing at our client’s site: some machines shared the same chassis serial number. These were in fact Supermicro “multi-node” servers, grouping four motherboards in a single chassis that shares cooling and power.
This situation prevented us from applying individualized configurations. The usual PXE solution is to use MAC addresses, but this approach has a major drawback: with multiple network interfaces, the presence of several MAC addresses creates ambiguity.
So we looked into using the motherboard serial number instead. Although iPXE documentation didn’t mention this possibility, when digging into the source code to implement it ourselves, we discovered that it already existed through the ${board-serial} variable. A pleasant surprise that saved us valuable time!
Wrapping it all into a Docker container image
Once our YAML inventory, scripts, and templates were ready, we could build a Docker image for our PXE infrastructure, including all the necessary components.
The image build process has 3 steps:
- Build iPXE binaries from source
- Generate configuration from templates
- Create the final image to be deployed on our PXE server
Building iPXE binaries from source
We need to compile our own iPXE binaries because the last official release dates back to 2020, and Linux distributions remain stuck on that version. On top of that, we need HTTPS support enabled to download Talos images from the project’s Factory.
Here are the corresponding Dockerfile instructions:
FROM ubuntu:noble AS builder-ipxe
ARG iPXE_VERSION=7e64e9b6703e6dd363c063d545a5fe63bbc70011
RUN apt-get -y -qq --force-yes update && \
    apt-get -y -qq --force-yes install curl build-essential liblzma-dev genisoimage
RUN curl -L https://github.com/ipxe/ipxe/archive/${iPXE_VERSION}.tar.gz | tar -xz
WORKDIR /ipxe-${iPXE_VERSION}/src
RUN sed -i 's/^#undef[\t ]DOWNLOAD_PROTO_HTTPS.*$/#define DOWNLOAD_PROTO_HTTPS/g' config/general.h

RUN mkdir /built
RUN make -j$(nproc) bin/ipxe.pxe && cp bin/ipxe.pxe /built
RUN make -j$(nproc) bin-x86_64-efi/ipxe.efi && cp bin-x86_64-efi/ipxe.efi /built
Generating configuration from templates
As mentioned earlier, we use Gomplate to generate our configuration files. This step is performed in a dedicated build stage to avoid unnecessarily bloating the final image:
FROM python:3.13-slim AS config-renderer
COPY ./nodes /nodes
COPY ./merge.py /merge.py
COPY ./templates /templates
COPY --from=gomplate/gomplate:v4.3 /gomplate /bin/gomplate
RUN pip install pyyaml
RUN ./merge.py /nodes/ | gomplate --datasource nodes=stdin://nodes.json --output-dir=/rendered --input-dir=/templates
Building the final image
Finally, we build the final image that will be deployed on our PXE server. This last step installs Dnsmasq and copies the iPXE binaries and generated configuration files:
FROM debian:bookworm AS runtime

RUN apt-get -y -qq --force-yes update && apt-get -y -qq --force-yes install -y dnsmasq

RUN mkdir /tftproot

COPY --from=builder-ipxe /built/ipxe.pxe /tftproot/
COPY --from=builder-ipxe /built/ipxe.efi /tftproot/
COPY --from=config-renderer /rendered/ipxe.conf /tftproot/
COPY --from=config-renderer /rendered/dnsmasq.conf /dnsmasq.conf

EXPOSE 67/udp
EXPOSE 69/udp

CMD ["dnsmasq", "--conf-file=/dnsmasq.conf", "--keep-in-foreground", "--user=root", "--log-facility=-", "--port=0"]
Deploying the image with GitLab CI
The final step is to automate the deployment. Our goal is to build and deploy the image on every change to the Git repository.
Since our client uses GitLab, we relied on its CI/CD system.
The pipeline consists of two jobs: build and deploy. The deploy job has a peculiarity: the target machine was inaccessible from the client’s standard GitLab runners, so we installed a project runner directly on the PXE machine. This runner was configured to expose the Docker socket to the job containers:
  [runners.docker]
    tls_verify = false
    image = "ubuntu:latest"
    privileged = false
    disable_entrypoint_overwrite = false
    oom_kill_disable = false
    disable_cache = false
    volumes = ["/cache", "/var/run/docker.sock:/var/run/docker.sock" ]   # <--
    shm_size = 0
    network_mtu = 0
This configuration allows the docker command inside the job to directly interact with the Docker daemon on the PXE machine to perform the deployment.
Here is our final .gitlab-ci.yml file:
stages:
  - build
  - deploy

build:
  image: docker:24
  stage: build
  before_script:
    - docker login -u $CI_REGISTRY_USER -p $CI_REGISTRY_PASSWORD $CI_REGISTRY
  script:
    - docker context create project-builder
    - docker buildx create project-builder --driver docker-container --use
    - docker buildx build --push -t $CI_REGISTRY_IMAGE:$CI_PIPELINE_IID
      --cache-to type=registry,ref=$CI_REGISTRY_IMAGE/cache,mode=max
      --cache-from type=registry,ref=$CI_REGISTRY_IMAGE/cache .

deploy:
  image: docker:24
  stage: deploy
  before_script:
    - docker login -u $CI_REGISTRY_USER -p $CI_REGISTRY_PASSWORD $CI_REGISTRY
  script:
    - docker pull $CI_REGISTRY_IMAGE:$CI_PIPELINE_IID
    - docker stop -t 2 $CI_PROJECT_NAME || true
    - docker rm $CI_PROJECT_NAME || true
    - docker run --detach --privileged --net=host --name $CI_PROJECT_NAME $CI_REGISTRY_IMAGE:$CI_PIPELINE_IID
    - sleep 2 && docker logs $CI_PROJECT_NAME
  tags:
    - deploy
Conclusion
And there you have it! We’ve turned a good old PXE server into a modern, containerized, GitOps-ready infrastructure.
No more SSH logins to tweak configurations—a simple commit is enough to add or update the configuration of a Talos Kubernetes node!
This approach makes it much easier to maintain the platform. There’s no need to document every change in a dusty wiki or wonder who did what and when… Everything is centralized in the Git repository!
Do not miss our latest DevOps and Cloud Native blogposts! Follow Enix on Linkedin!